Most UK homeowners face a frustrating dilemma. You need a place to store your Christmas decorations and old suitcases. But you also want to lower your energy bills.
Current building regulations are clear. To keep your home warm, you need 270mm of mineral wool insulation.
The problem? Standard loft joists are usually only 100mm or 150mm deep. If you lay boards directly onto those joists, you can only fit a thin layer of insulation.
If you try to "squash" 270mm of insulation under standard boards, you ruin it. You lose the heat-saving benefits and risk creating a damp, rotting environment.
You don't have to choose between storage and warmth. This guide explains how to achieve the perfect 270mm depth while maintaining a safe, usable floor.
Why 270mm is the Magic Number in 2026
The UK government has ramped up energy efficiency targets. By now, most homeowners are aware of the 2026 Future Homes Standard.
Insulation is measured by its "U-value." This is how effectively it stops heat from escaping. To hit the required targets, 270mm of mineral wool is the standard industry recommendation.
Why 270mm specifically?
- Heat Retention: It creates a thick thermal blanket.
- Cost Efficiency: Mineral wool is affordable and highly effective at this depth.
- Regulations: It is the benchmark for passing building inspections and improving your EPC rating.
If your insulation is thinner than this, you are literally watching money leak through your roof. But simply throwing more wool up there isn't enough. You have to install it correctly.
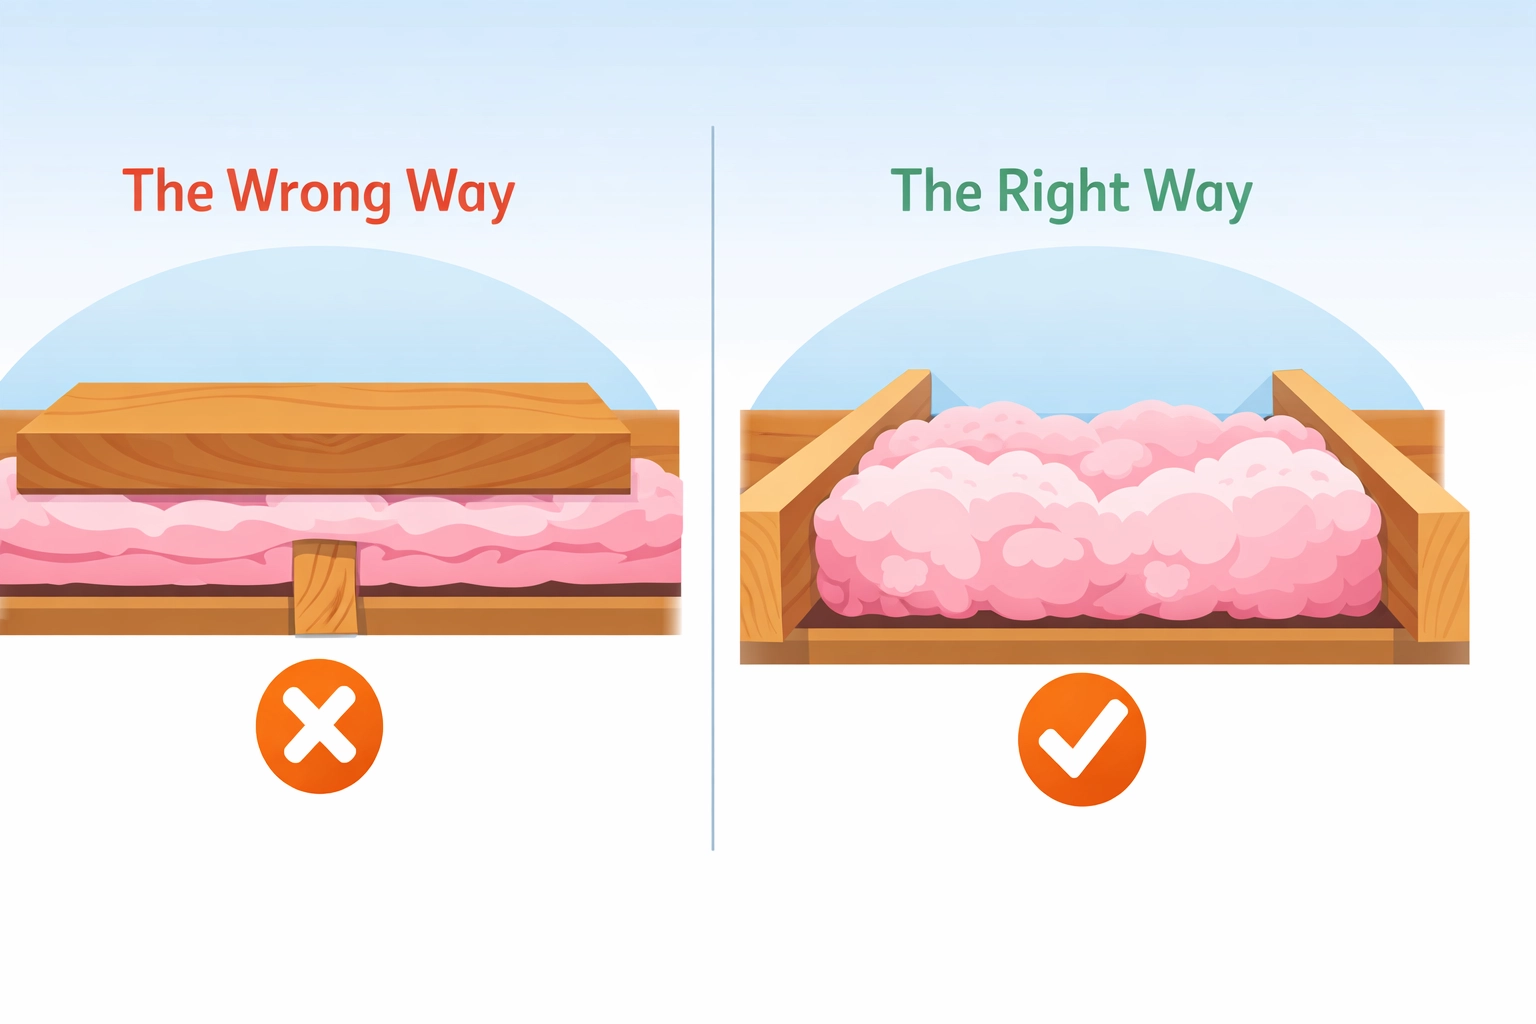
The Compression Trap: Don't Squash Your Wool
Mineral wool works by trapping air between its fibres. It is that "still air" that provides the insulation.
When you place heavy boxes or wooden boards directly onto the wool, you squash those air pockets. This is known as compression.
What happens when you compress insulation?
- Efficiency Drops: Squashing 270mm of wool down to 100mm reduces its effectiveness by over 50%.
- Thermal Bridging: Your wooden joists act as bridges, carrying heat away from your rooms and into the cold loft.
- Moisture Risks: Compressed wool can trap moisture against the joists, leading to mould and wood rot.
You must keep the wool "lofty" and full of air. To do this, your floorboards must sit above the insulation, not on it.
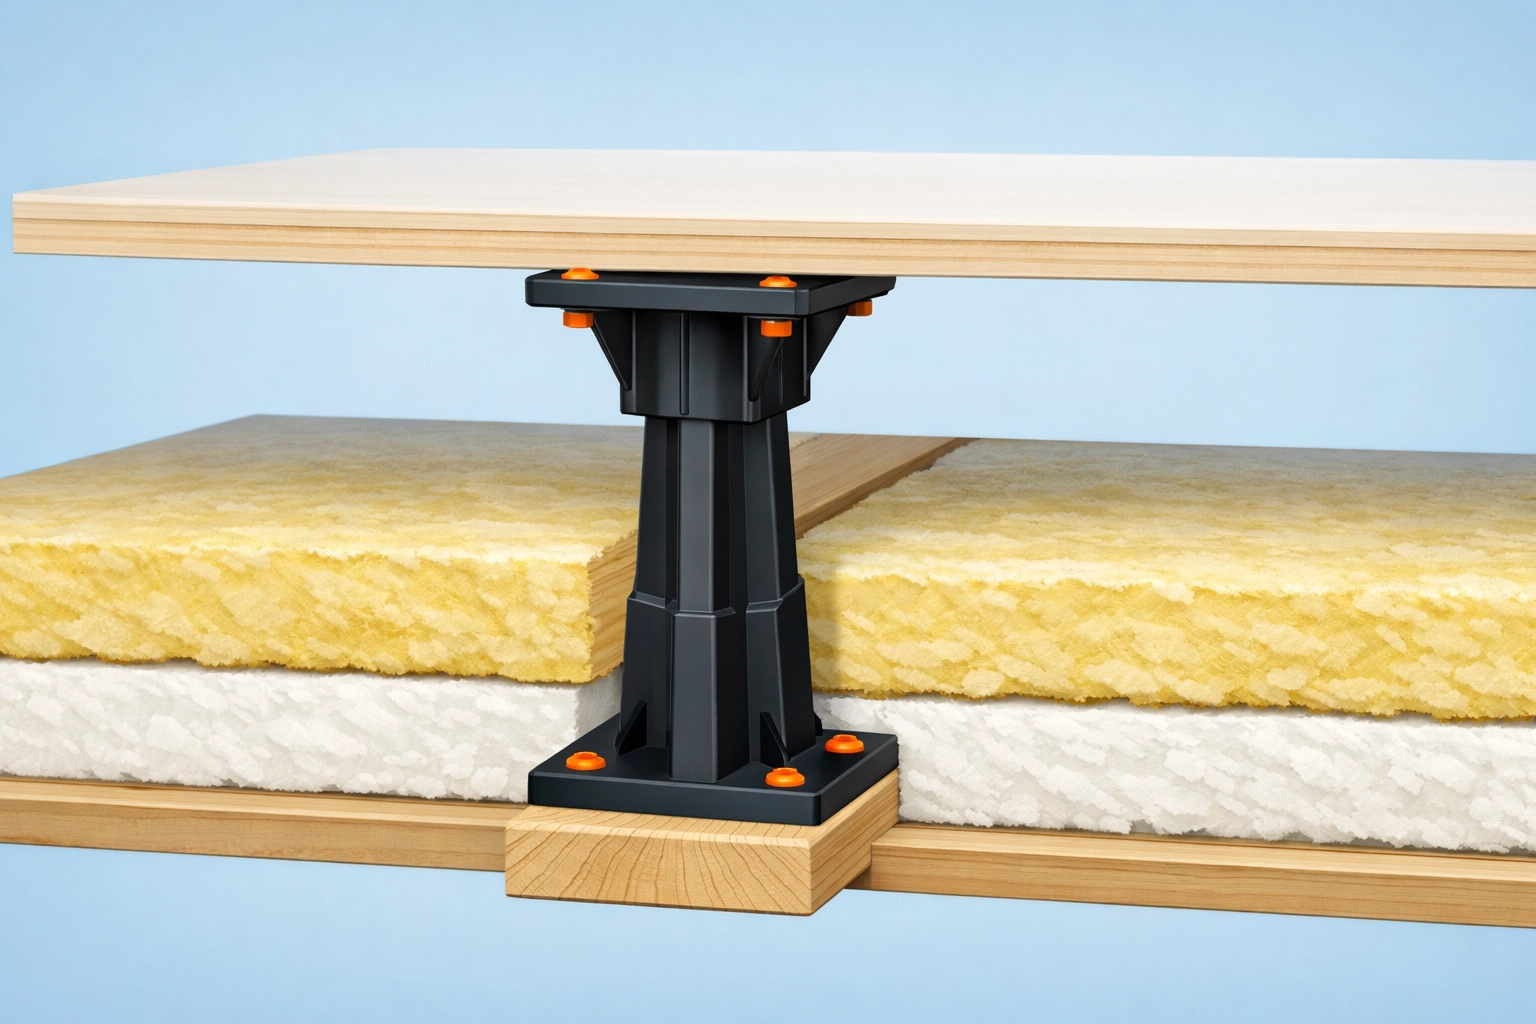
The Solution: Raised Loft Boarding
To get 270mm of insulation and a solid floor, you must raise the floor level. This is achieved using a "raised loft boarding system."
There are two primary ways to do this: Loft Legs (Stilts) and Subframe Systems.
1. Loft Legs (Stilts)
Loft legs are ultra-strong plastic stilts. They screw directly into your existing ceiling joists. You then screw your floorboards onto the top of these stilts.
The Benefits of Loft Legs:
- Height: They typically provide 175mm to 200mm of lift.
- Simple: They are easy for a professional to install quickly.
- Versatile: They work with most standard joist widths.
By using loft legs, you can have 100mm of insulation between the joists and another 170mm running across them. The boards sit safely on top of the stilts, leaving the wool untouched.
2. Raised Subframes (e.g., LoftZone)
For larger lofts or heavy-duty storage, a metal and plastic subframe system is often better. These systems, like LoftZone StoreFloor, create a secondary internal structure.
Why Choose a Subframe?
- Structural Integrity: They distribute weight more evenly across the joists.
- Uniformity: They provide a perfectly level surface, even if your joists are uneven.
- Strength: Designed to handle the weight of heavy storage without stressing the ceiling.
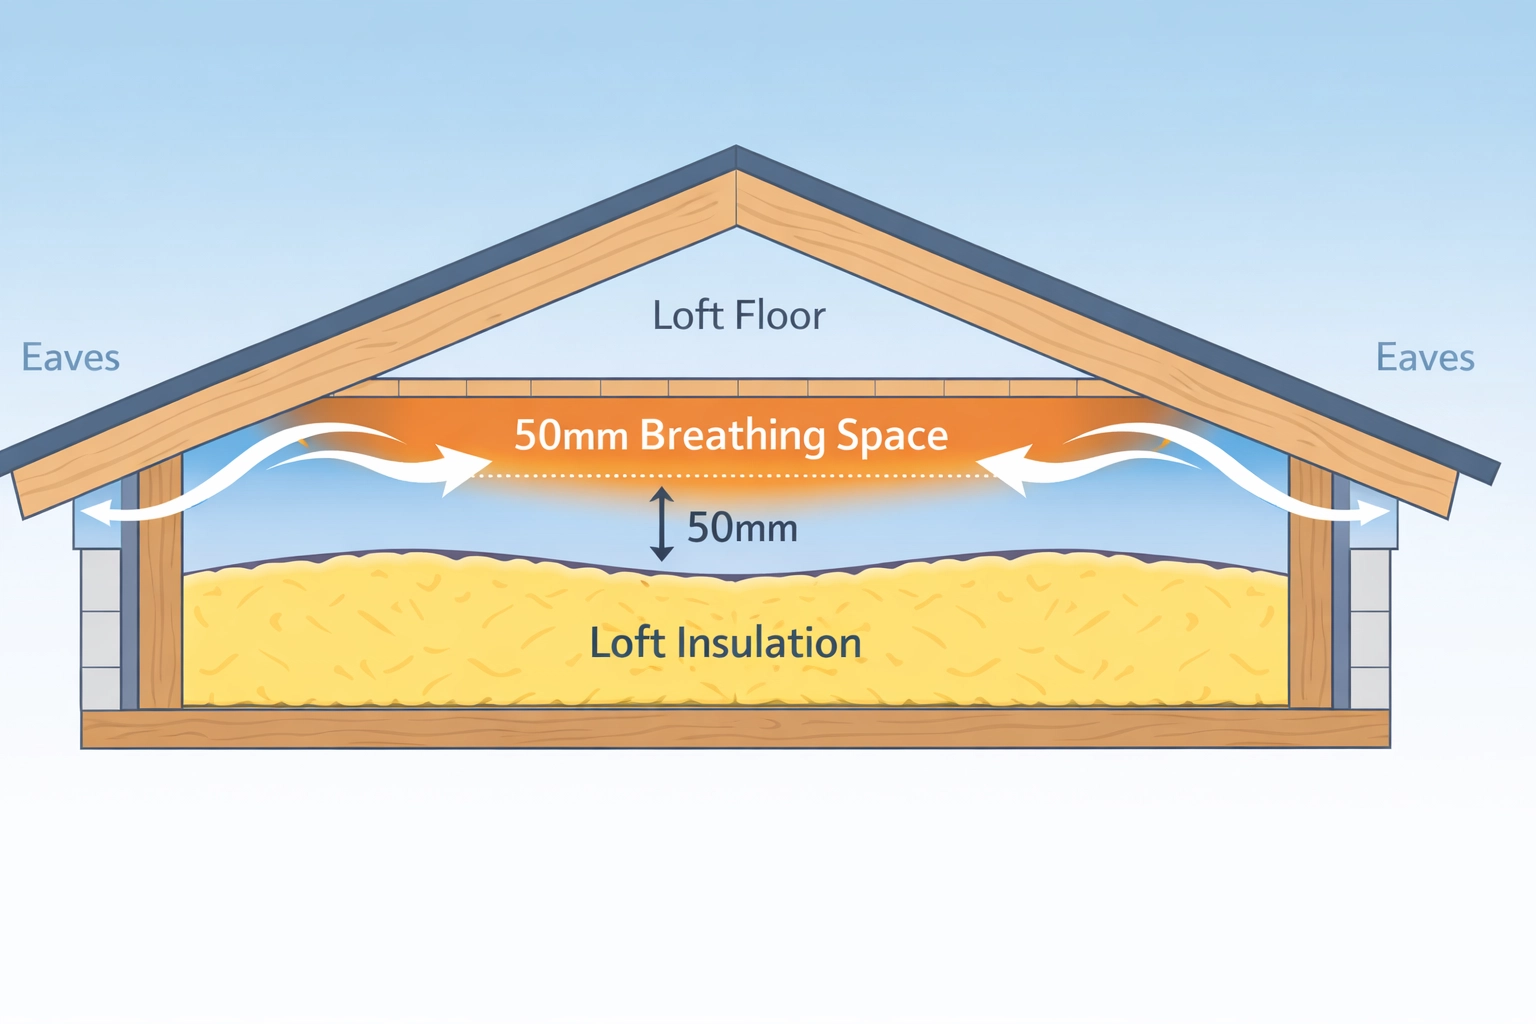
Maintaining the 50mm Air Gap
Raising the floor isn't just about making room for the wool. It’s also about ventilation.
A professional installation ensures there is a 50mm air gap between the top of the insulation and the underside of your new floorboards.
Why is this air gap vital?
- Airflow: It allows air to circulate from the eaves across the loft.
- Condensation Control: It prevents moisture from getting trapped under the boards.
- Longevity: It keeps your timbers dry and your insulation effective for decades.
Without this gap, you risk "sweating" in the loft. This leads to damp patches on your upstairs ceilings and potentially dangerous mould growth.
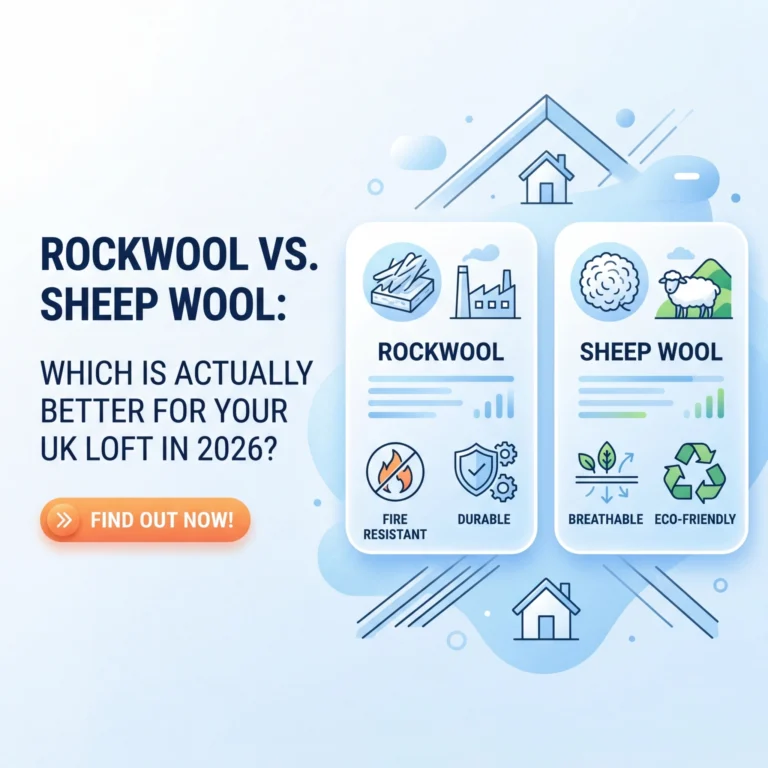
What Material Should You Use?
While there are many options, mineral wool remains the king of loft insulation. It is fire-resistant, breathable, and provides excellent acoustic benefits.
However, some homeowners consider alternatives like multifoil or natural wools. You can compare these in our guide on Mineral Wool vs. Multifoil Insulation.
Regardless of the material, the rule remains the same: Do not compress it.
If you currently have spray foam insulation and are looking to board your loft, you may face different challenges. Many lenders now require the removal of spray foam before approving mortgages. You can read more about why UK lenders are demanding a change.
Safety First: Weight and Load Limits
Before you start boarding and filling your loft with heavy boxes, you must consider weight.
Most modern loft joists are designed to support the weight of the ceiling and a person for maintenance. They are not always designed to hold a lifetime of heavy storage.
Professional Tips for Safe Storage:
- Spread the Load: Use a raised boarding system that distributes weight across multiple joists.
- Know Your Limits: A standard raised system usually supports about 50kg per square metre.
- Declutter: Don't store heavy furniture or gym equipment in the loft unless the joists have been specifically reinforced.
- Use Professionals: If you are unsure, book a free survey to check your loft's structural suitability.
Step-by-Step Logic for Your Loft Project
If you are planning to upgrade, follow this simple logic to ensure you meet the 270mm standard.
- Clear the Space: Remove old storage and any debris.
- Check Ventilation: Ensure your eave vents are clear and not blocked by old insulation.
- Install the Base Layer: Lay insulation between the joists (usually 100mm).
- Fix the Supports: Install your loft legs or subframe system.
- Install the Top Layer: Lay the remaining insulation (usually 170mm) perpendicular to the joists.
- Leave the Gap: Ensure the top of the insulation is below the top of the supports.
- Board Over: Screw your tongue-and-groove boards onto the supports.
The Financial Benefit of Raised Boarding
Investing in a raised boarding system might seem like an extra cost. However, it is a smart financial move.
- Energy Savings: Proper 270mm insulation can save the average UK household hundreds of pounds per year.
- Property Value: A clean, boarded, and energy-efficient loft is a huge selling point. Check our guide on 10 things to know about loft insulation when selling.
- Future-Proofing: You avoid the cost of having to redo the work when the EPC C requirement becomes mandatory for more properties.
Final Thoughts
You don't have to sacrifice your storage space to have a warm home. By using loft legs or a raised subframe, you can maintain a full 270mm of insulation and a safe, usable floor.
Avoid the compression trap. Protect your home from damp. Keep your energy bills low.
If you are ready to transform your loft into a high-performance, storage-friendly space, we can help.
Book Your Free Survey with ComfySeal Today or get a quick quote online.