
Winter is tough on your home. Your loft takes the biggest hit.
Cold temperatures, rain, and snow create perfect conditions for problems. Damp and pests love a neglected loft space. Spring is your chance to catch issues early.
A quick inspection now saves expensive repairs later. Let's walk through exactly what to look for.
Why Winter Takes a Toll on Your Loft
Your loft sits between the heated house below and the cold roof above. This creates temperature fluctuations throughout winter.
Warm air rises from your living spaces. When it meets cold surfaces, condensation forms. Over months, this moisture builds up.

Meanwhile, wildlife seeks shelter from the cold. Mice, rats, squirrels, and birds find loft spaces irresistible. They squeeze through tiny gaps you'd never notice.
By spring, you could have hidden water damage or unwanted guests. Neither problem fixes itself.
Signs of Damp to Look For
Damp doesn't always announce itself obviously. You need to know the warning signs.
1. Musty Smells
That earthy, stale odour is often your first clue. If your loft smells different, investigate further.
Mould and mildew produce distinctive smells. Trust your nose.
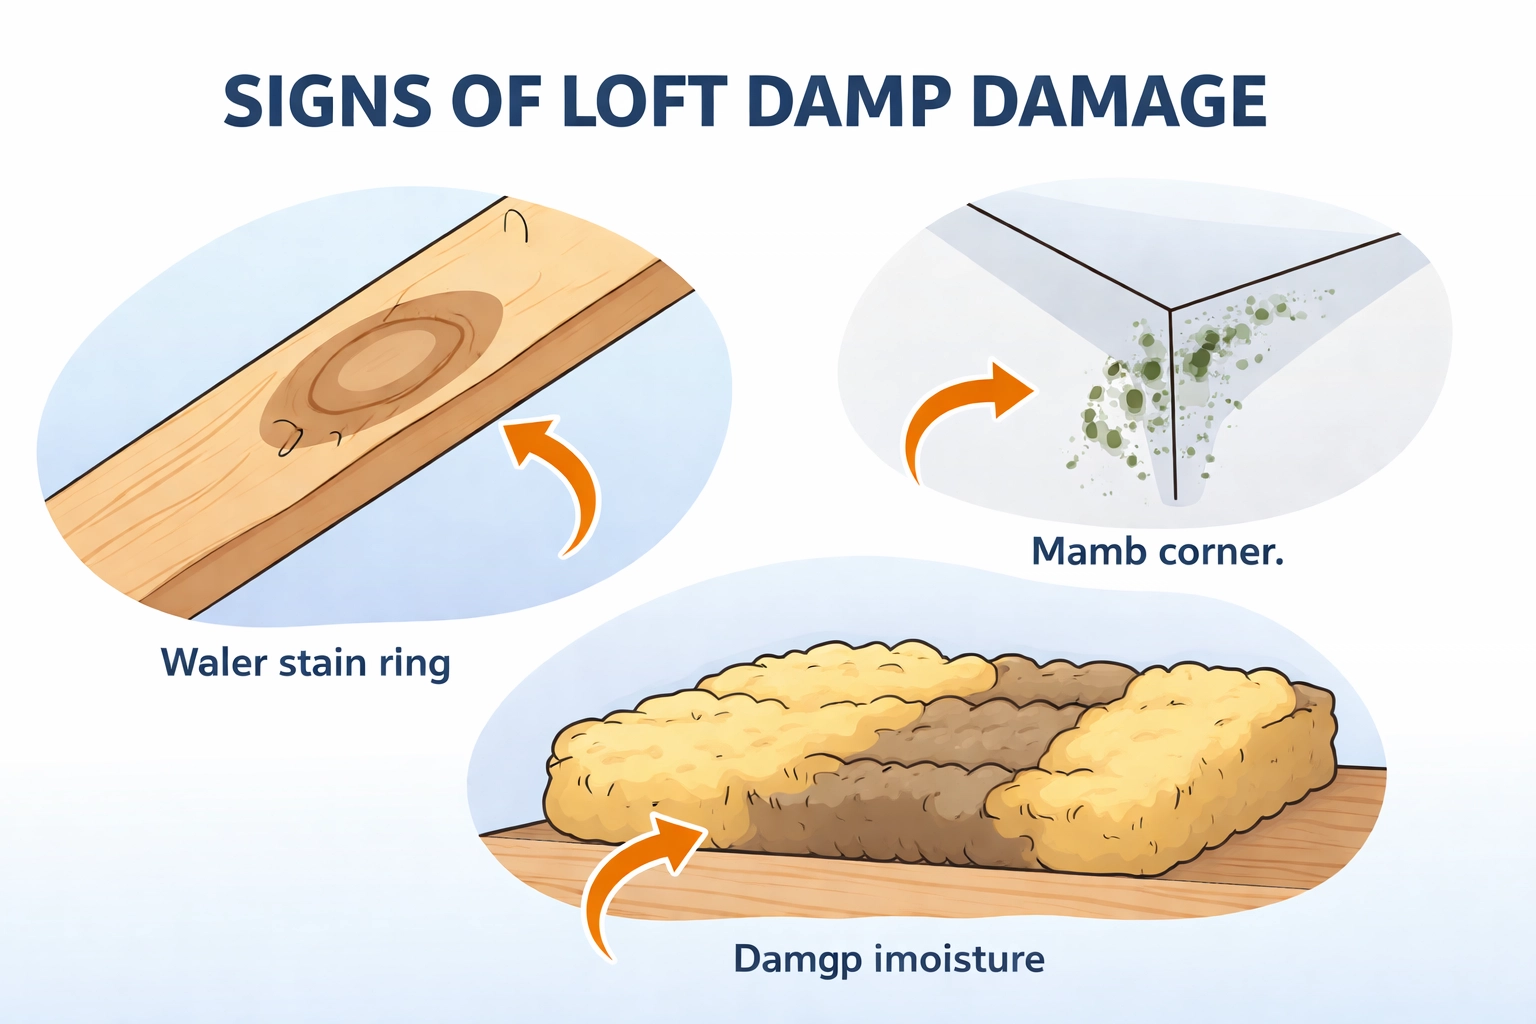
2. Visible Mould Growth
Check corners, around roof timbers, and near vents. Mould appears as black, green, or white patches.
Even small spots indicate excess moisture. Don't ignore them.
3. Water Stains
Look for discoloured patches on rafters and boards. Brown or yellow rings suggest past or ongoing leaks.
Stains near the chimney or roof edges are common. These areas are prone to water ingress.
4. Wet or Damp Insulation
Touch your insulation carefully. It should feel dry and fluffy.
Wet insulation loses effectiveness. It also encourages mould growth. Compromised insulation needs replacing.
If your insulation looks damaged, consider upgrading to multifoil loft insulation or mineral wool top-ups.
5. Peeling Paint or Bubbling Surfaces
These signs often appear on the ceiling below. They indicate moisture seeping through from above.
Check the loft area directly above any interior damage.
Signs of Pest Infestations
Pests leave evidence behind. Here's what to look for during your inspection.
1. Droppings
Rodent droppings are small, dark pellets. You'll find them along walls, near entry points, or in corners.
Mouse droppings are rice-sized. Rat droppings are larger, about 1-2cm long.
2. Gnaw Marks
Rodents chew constantly. Check wooden beams, stored boxes, and electrical cables.
Damaged wiring is a fire hazard. Take gnaw marks seriously.
3. Nesting Materials
Shredded paper, fabric, or insulation suggests active nests. Pests tear apart soft materials for bedding.
Look in secluded corners and behind stored items.
4. Sounds and Scratching
Have you heard scurrying noises overhead? Scratching in walls or ceilings often means rodents.
These sounds are loudest at night when pests are active.
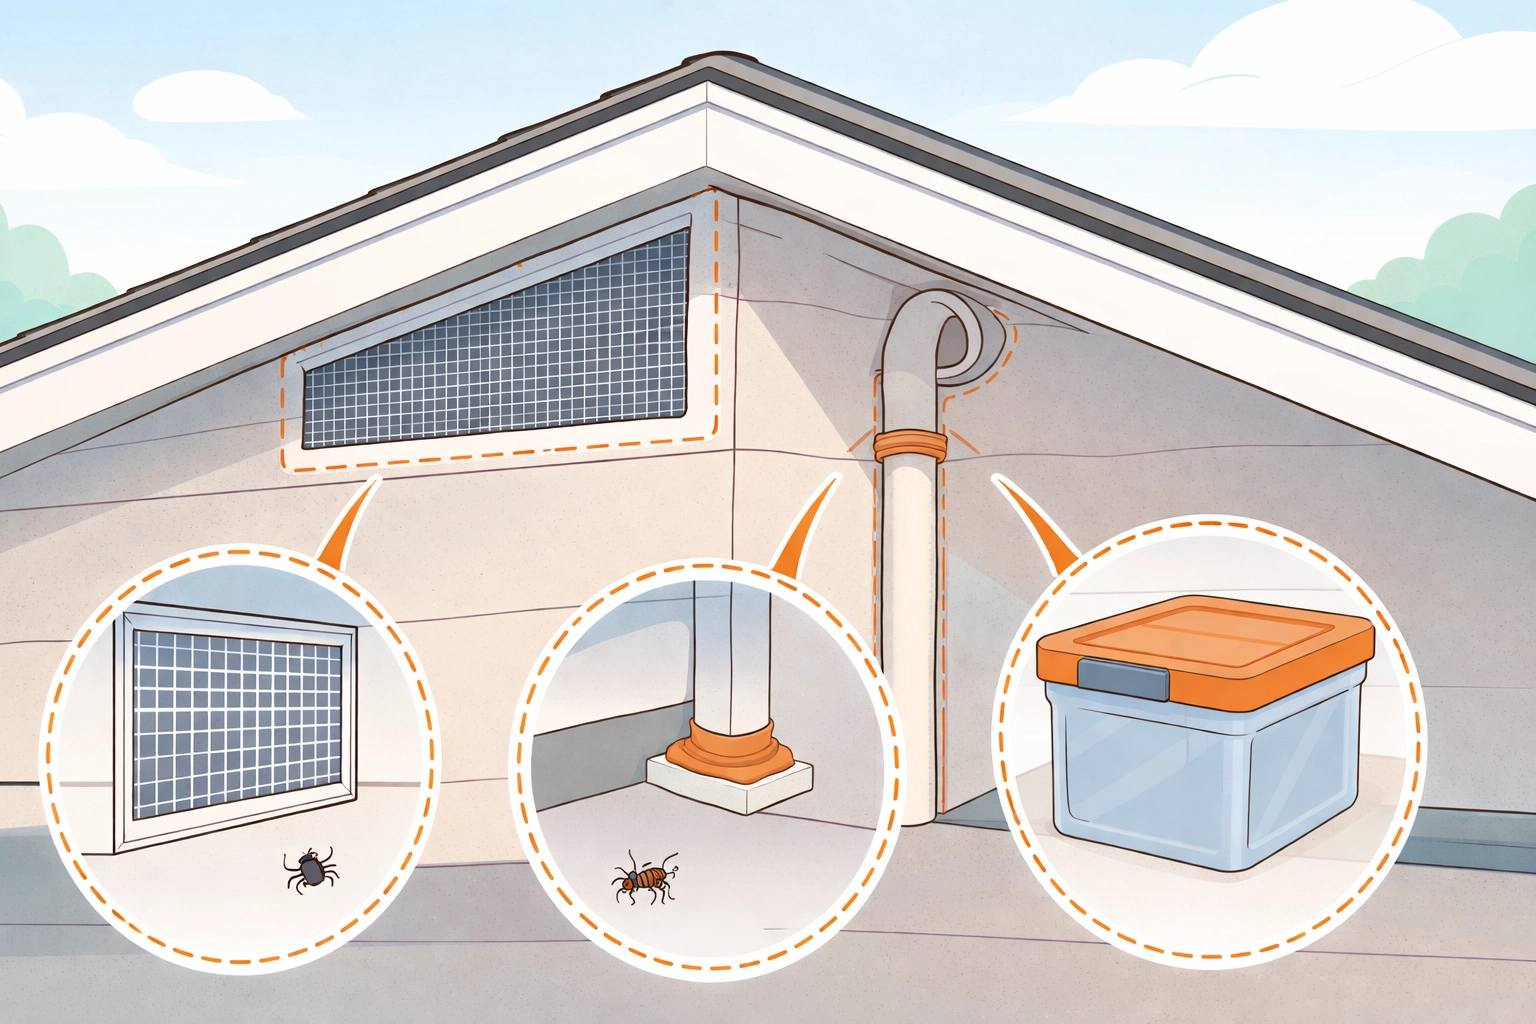
5. Entry Points
Look for gaps around pipes, vents, and eaves. Mice squeeze through holes the size of a pen.
Birds enter through damaged soffits or missing roof tiles.
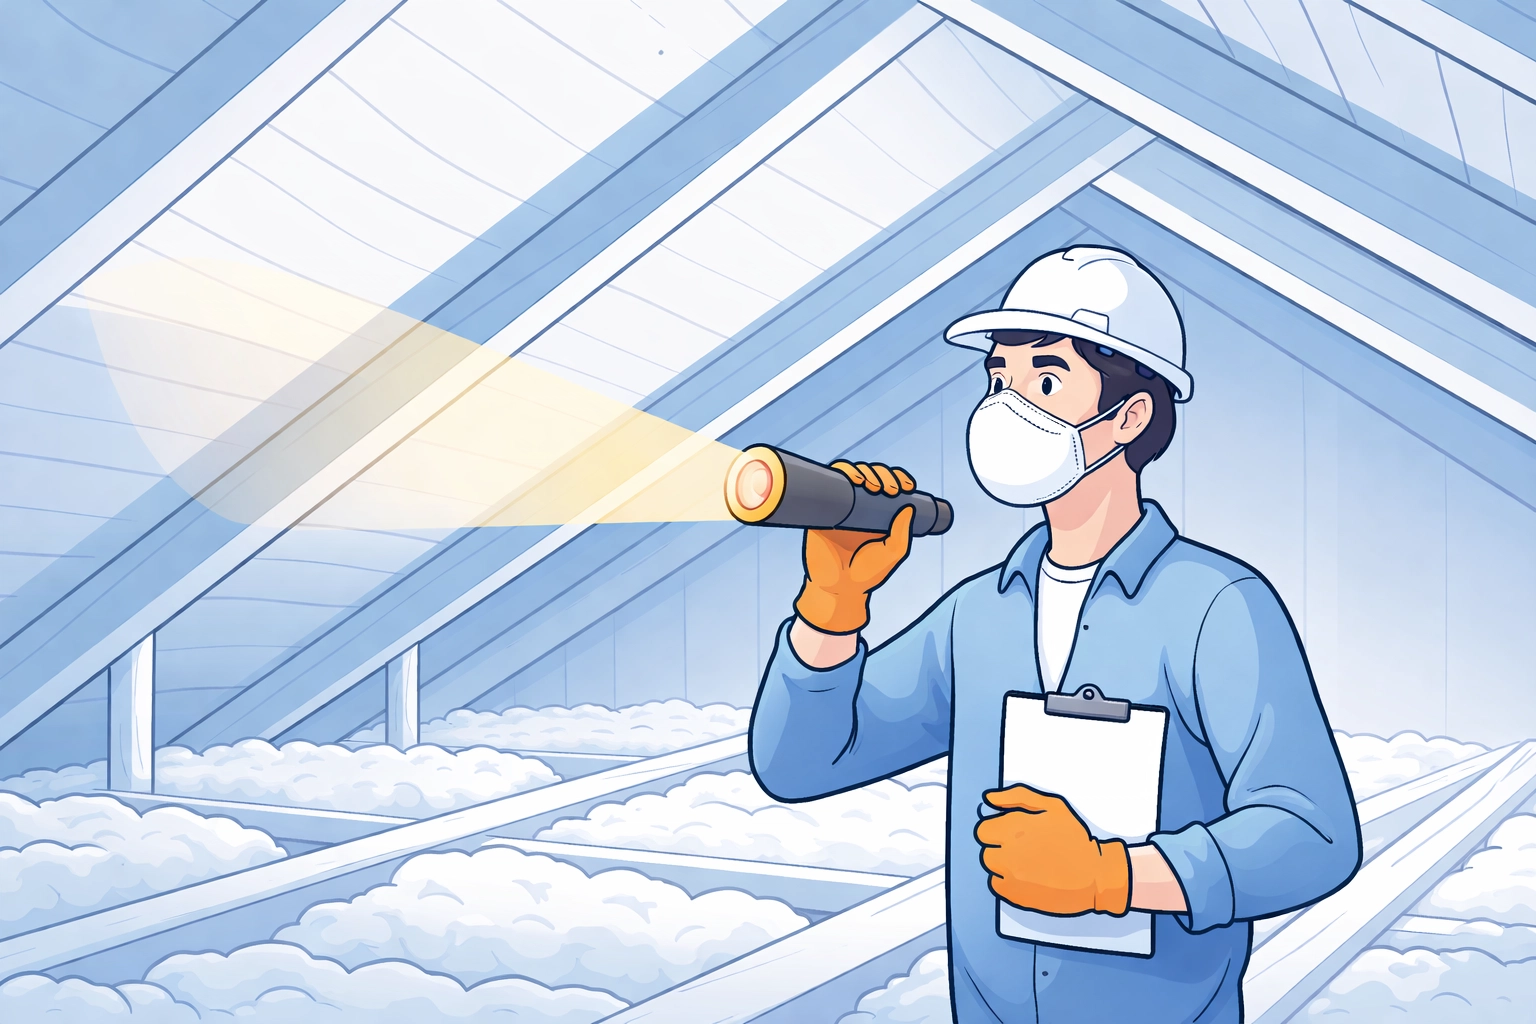
How to Inspect Your Loft Safely
Before climbing up, prepare properly. Safety comes first.
Wear Protective Gear
Use a dust mask to avoid inhaling fibres and spores. Wear gloves and long sleeves.
Old insulation materials can irritate skin and lungs.
Use Proper Lighting
A powerful torch is essential. Loft spaces are dark, even during daylight.
Good lighting reveals problems you'd otherwise miss.
Watch Your Step
Only stand on joists or boards. Never step on insulation or plasterboard ceilings.
One wrong step could send you through the ceiling below.
Work Methodically
Start at the hatch and work outward. Check every section systematically.
Don't rush. A thorough inspection takes 30-45 minutes.
Take Photos
Document anything concerning. Photos help professionals assess problems remotely.
They also provide before and after evidence if repairs are needed.
What to Do If You Find Problems
Discovered an issue? Don't panic. Most problems have straightforward solutions.
For Damp Issues
Minor condensation often improves with better ventilation. Open or install loft vents.
Persistent damp needs professional assessment. Leaks require roofing repairs before any insulation work.
Wet insulation should be removed and replaced. Damaged timber may need treatment.
For Pest Problems
Remove nests carefully using gloves. Dispose of materials in sealed bags.
Block entry points with wire mesh or expanding foam. For severe infestations, call pest control professionals.
Disinfect affected areas thoroughly. Rodent droppings carry health risks.
For Insulation Damage
Damaged or compressed insulation needs topping up. Wet insulation must go entirely.
Properly installed insulation prevents future damp issues. It also keeps pests from nesting.
Want expert advice? Book a free consultation with our team.
Prevention Tips for the Year Ahead
Fixing current problems is just step one. Prevent future issues with these measures.
Improve Ventilation
Your loft needs airflow. Blocked vents cause condensation to build up.
Ensure eaves vents and ridge vents remain clear. Consider adding more if damp persists.
Check Your Roof Regularly
Missing or cracked tiles let water in. Inspect your roof from ground level each season.
Address minor damage before it becomes major.
Seal Entry Points
Walk around your home's exterior. Look for gaps where pests could enter.
Fill holes with wire wool and sealant. Replace damaged soffits and fascias.
Store Items Properly
Use plastic containers instead of cardboard boxes. Pests can't chew through plastic.
Keep stored items away from walls. This makes inspections easier.
Upgrade Your Insulation
Modern insulation resists moisture better. It also leaves fewer gaps for pests to nest.
Quality insulation pays for itself in energy savings. Learn more about your options in our multifoil insulation guide.
Schedule Annual Inspections
Make loft checks part of your yearly routine. Spring is ideal timing.
Catching problems early keeps repair costs low.
When to Call the Professionals
Some issues need expert attention. Know when DIY isn't enough.
Call a professional if you find:
- Extensive mould covering large areas
- Structural damage to roof timbers
- Severe pest infestations
- Signs of roof leaks you can't locate
- Asbestos-containing materials
Professional loft surveys identify problems you might miss. They also recommend the most effective solutions.
Not sure what you're dealing with? Get a quote for a professional assessment.
Final Thoughts
Your loft protects your home from above. It deserves attention after a long winter.
A spring inspection takes less than an hour. It reveals damp and pest problems before they escalate.
Check for moisture, mould, and unwanted visitors. Fix small issues now. Upgrade insulation if needed.
Your home will be healthier, warmer, and pest-free. That's a spring clean that truly makes a difference.
Ready to improve your loft space? Book your free consultation with ComfySeal today.